
DIY Fresh Holiday Garland
Psst. Like our cover photo? Colleen Jeffers dressed up her V-Bar sideboard with a DIY holiday garland of her own. She also wrote up an excellent drink recipe for us. There are more modern sideboards to see!
‘Tis the season! For eggnog, for cookies, for friends and jolly music, and for some DIY holiday crafts. Hopefully you are reading this post with a glass of something warm and/or alcoholic on-hand, and a few hours of time in front of you. Making your own fresh holiday garland is simple. Let’s get going.
Gather your supplies.The Good Drink

To build your own holiday garland, you’ll need to gather a few key supplies before you begin.
- Foliage! We recommend three different kinds for variety, but you can add / subtract according to your preference. Evergreens like cedar can be foraged (responsibly, please!), whereas specialty items like eucalyptus will need to be purchased from your local florist. From left to right, we’re using “baby blue” eucalyptus, “seeded” eucalyptus, and hemlock.
- Paddle wire, available at your local craft store.
- Heavy wired twine, available at your local craft store.
- A pair of snips. Keep in mind you’ll be cutting branches and wire, so something heavy-duty is recommended.
Prep your foliage.

Ready your foliage for bundling. Cut long stems into lengths of about six inches, and then strip the leaves from the bottom quarter of those lengths. This makes it easier to bind your bundles, and makes for a cleaner presentation.
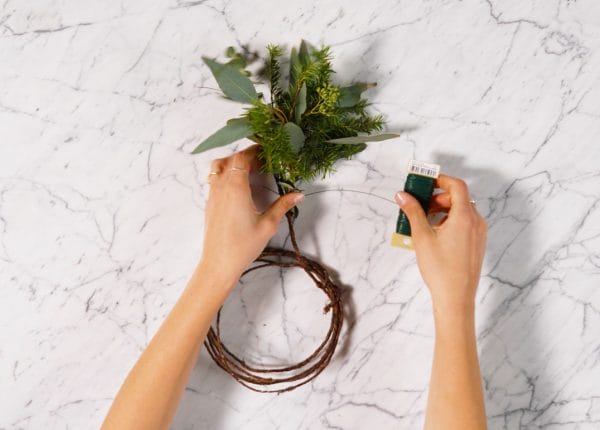
Bind your bundle.

Combine your ingredients into a bundle. Using a length of wire, bind your ingredients together. Be sure to wrap your bundle tightly! We recommend binding in bulk to make it building your actual garland faster and smoother.
Prep your twine.

Once you’ve built up your bundle pile, ready your heavy twine. Measure and cut according to your desired length. At one end, make a loop and twist your twine together. This is the starting end. The loop will be in handy when you’re hanging or securing your garland later!
Attach your bundles.
Now for the good stuff. Grab a bundle from your pile and lay it along your twine. The fun, bursting end should cover your loop, and the tied end should point towards you. Using your paddle wire, bind the bundle to your heavy twine. Do not cut your wire! You’ll be binding your bundles using a single length of wire. This makes it easier to pull your line tight, making your garland much more stable.

Keep adding bundles from your pile, ensuring that the fun bursting end covers the previously-laid tied end, and securing with your single length of wire. For a fuller garland, alternate securing your bundles to the “front” and “back” of your twine. If you’re in a hurry, you can bind your bundles to the front. Continue laying and binding bundles until you’ve reached your desired length. Once you’re at the end of your… twine… make a hook to help you secure your garland.

Colleen Jeffers of The Good Drink dressed up her V-Bar sideboard with a DIY holiday garland of her own.
Ta da! You’ve made your very own holiday garland. For all that hard work, you deserve a drink. We recommend a Scandi 75, made especially for Article readers by cocktail writer Colleen Jeffers of the Good Drink. She also made that garland above. Happy holidays, everyone.